Showing posts with label cook. Show all posts

Cooking Class: A Review


Santa, clever elf that he is, brought my cooking obsessed kids Cooking Class this Christmas.  They immediately wanted to try out several recipes.  We started with Sushi! California Rolls.

Cooking Class is published by Storey, the same publisher of Sewing School.   It reads very much like Sewing School and my kids were able to jump into the format easily.

It feels like Sewing School, only cooking.  There are great step-by-step photo illustrations, real kids in the kitchen cooking, and recipes that kids want to make.  And my kids wanted to make sushi!

The kids used their new knives, also courtesey of Santa, for chopping up the cucumbers and crab stix.

We had fun going to our local Asian market for all the necessary ingredients and supplies including a bamboo sushi mat!

Here is the new knife in action, cutting a successful roll.

The actual making of the rolls was a very messy endeavor.  Our first couple of rolls didn't look anything like the picture, but they tasted great - like real California Rolls!  Luckily our dog was around to clean up the rice speckled floor.
Next up are these yummy sounding breakfast sundaes!  I love how all the recipes are doable for kids. 
There are several "idea" pages such as this one for making a Chocolate Factory.  Those chocolate dipped potato chips have my name on them!
The back of the book has several pages of cute stickers, recipe cards, and even a game to spark dinner time conversation.
Bon Apetite!  I can't wait to try what the kids make next from Cooking Class.

What's Up

Here are some things that are taking up my summer days...

Reading:
Excited to see a Mollie Makes U.S. edition!  I have been a fan of the U.K. based magazine for years.  It's packed with super cute projects, ideas, and crafters that you want to become friends with.  The only downside of the American version is that it doesn't include a free project with each issue.

Sewing:
I am attempting to make more fitted dresses.  I have always shied away from sleeves and waists.  This is my first attempt using the Built By Wendy Dresses book.  The pattern was actually harder than I anticipated.  While I love the Built By Wendy books, I think this one may be a little more advanced.  I'm pretty happy with the fit, but need to make more to get it right.  Instead of making a traditional muslin, I used an old sheet that belonged to my sweet grandmother.

Listening:
I have been a fan of Abby Glassenberg for years and her While She Naps Podcast seals the deal.  Each episode she talks to some of my favorite crafters about how they got started, the bushiness side of crafting, as well as their favorite tools and inspiration.  If you are at all interested in such things, you should have a listen. 

Eating:
 Mmmm...blueberries!  It's berry season in the South and we have had fun picking our own.  I made the yummiest blueberry lime jam that I can't get enough of.  The kids and I have been making "jam shakes" with a big scoop of jam, greek yogurt, almond milk, and a frozen banana. 

What have you been up to this summer?

Cupcake flags

Even cupcakes taste better with little fabric flags! 

P. S.  I used this tutorial

Southern Vegetarian

I am so so excited for Justin, the wonderful Sewing School photographer, and his lovely wife Amy on the release of their new cookbook The Southern Vegetarian.  After posting yummy vegetarian recipes for years at The Chubby Vegetarian, they turned their passion for cooking, mouth watering food photography, and eating into a cookbook.  Even if you aren't a vegetarian, Justin's recipes are amazing! 

While working on Sewing School 2, Justin and I would get together at our weekly photo shoots and discuss book writing, new recipes, Top Chef, and sewing between shots.  It's exciting to see the finished product.

Congrats Justin and Amy!

No Measure Granola

Is there anything better than a bowl of homemade granola?  I've been making some for the last few months and had a few recipe requests from friends, so here it is for all!

My recipe is quite simple and requires you to eyeball your ingredients instead of measuring them.  Much simpler in my opinion.  It's also open to many different ingredients so you can make it to suit  your tastebuds.  I tend to buy my seeds and oats in bulk and just pull down the little lever until I feel like there's enough.  I buy nuts in bulk and keep them in the freezer so that they will keep longer.
No Measure Granola
Dry Ingredients - that's what's in the big bowl above:
*rolled oats - I have the most of these, about 3 or 4 scoops from the bulk bin (don't use quick oats)
*sesame seeds
*raw pumpkin seeds
*raw sunflower seeds
*chopped nuts (I like to use a mixture of walnuts and almonds)
*wheat germ
*coconut flakes
*brown sugar
*big sprinkles of cinnamon, ginger, and nutmug
*pinch of salt
*if you like dried fruit, add some too

Wet Ingredients:
You'll need about 2 cups of wet ingredients to mix into a big bowl of granola.  I know, I know, I said no measure, but I tend to mix all my wet ingredients together in a big mixing cup. 
*oil (olive or vegetable)
*maple syrup or honey (you'll want something sweet)
*apple juice or apple sauce or a mix of both

Wisk all the wet ingredients together.  Gradually add the wet mixture to the dry ingredients and mix around with a rubber spatula.  You want the mixture to be moist, not drenched.

Spread onto 2 baking sheets lined with a silpat or parchment paper.  Bake for about 30 minutes at 350 until the top is golden brown.  The little burnt edges are yummy, so don't worry.  Let cool in pan.  Break into chunks into a big container.  We like ours with berries and almond milk.

When I first started making granola, I used this recipe from Orangette as a basis, which has measurements. 

Happy granola making!


Making Meyer Lemon Marmalade

 I was introduced to meyer lemon marmalade last year by my friend Jennifer and fell in love.  It's tart, but not too tart; sweet, but not too sweet.  A little bit tangy and really gives you a burst of sunshine on a winter's morning.  This year, I begged to be shown how to make this yummy goodness. 

While I have done some pickling and a little canning in the past, I am not an expert and have never tried my hand at jams.  Come into the kitchen with us and I'll share a little of what I learned.

Jennifer's recipe was in her head, but I found this one that seems quite similar. 

Pantry items:  2-1/2 lbs. meyer lemons, 6 cups of sugar, 4 cups of water.
For canning materials and how-to, check the link above as well as a good canning book.  My current favorite is Put 'em Up and Jennifer swears by the Ball Blue Book.

 Several recipes I looked at called for thinly slicing your lemons, but I cut my lemons into little triangles - I got 16 per lemon (or 8 per half of lemon).  I like the result of the chunks of lemon you get instead of little slices. 
 Here it is almost ready - can you see how it turned a lovely, dark amber color?  I kept sneaking little tastes - so yummy!
Sterilized and filled jars in the water bath. 
 Waiting and chatting.  We did a lot of this while making the marmalade, which is why it is more fun to can with a friend.  Jennifer is one of those women who works full time and has two kids, but still manages to do so many cool, creative things.  The whole process took about 2-1/2 hours, so we talked about everything under the sun.
Finished jars waiting to cool and be eaten.  I like mine best on good toast, smeared with cream cheese and then a big topping of the marmalade on top.  It's also yummy as a PB&J.

Meyer lemons are only in season for a little longer, so even if you don't have time to make your own marmalade, you should get a few to try.  They have such an interesting citrus taste.

Can't wait until next year to make it again!

Jam Jar Cocktails

This summer, Eric got the bright idea to put our to-go drinks into jam jars.  They were the perfect container for taking yummy cocktails and lemonade down to the dock, outdoor concerts, you name it. 

Just fill old jars with ice and your favorite drink, screw on the top tight, and hit the road!

Kitchen Bouquet

At first glance, these little bouquets may look like your ordinary garden variety.  However, tucked inside are little kitchen surprises.  Sprigs of herbs not only smell good, but come in handy while cooking too.

Need some parsley for your salad, pinch a bit.
A little mint or lemon verbena for your tea?
Add some rosemary to those potatoes.

Next time you cut some flowers from your garden, add some herbs to the mix.  You'll be glad you did.

We Love Gnocchi


 Ricotta gnocchi is a favorite at our house.  Who knew it was so easy to make.  In fact, Phoebe is going to show you how.  Here's how we do it:

2 eggs
2 cups of all-purpose flour
2 cups (or 1 small tub) of ricotta

Bring a large pot of water to a boil.
Mix up the ingredients in a bowl.  It gets pretty sticky, but will come together in a ball.

Above, Phoebe is demonstrating above how to form the gnocchi - there is probably an exact science to it, but our way tastes great.
1. On a floured board, break off small chunks of the dough and roll them into a medium/skinny log.
2.  Cut the log into about 1 inch pieces.
3.  Press the pieces gently with a fork.

Now, you have gnocchi!  Boil them in small batches - you want them to have lots of room to boil.  When they rise to the top and are floating around up there, you know you're done.
You can top your gnocchi however you like - red sauce, pesto, plain (Frankie's choice) but our favorite is sage brown butter!

Brown about 2 or 3 Tablespoons of butter in a large skillet.
As soon as it begins to brown, add some salt and pepper to taste.
Then toss in some chopped up sage leaves (about 4 or 5 large leaves) and your gnocchi.  Cook until the gnocchi is heated through and gets a little crispy on the outside.
Top with grated parmesan.  Eat!

Blueberry Time

Summertime means blueberry picking to me. Each year, I anxiously await the notice from Nesbit Blueberry Farm that it's time. This year, I went twice! Picking fruit and veggies yourself and with kids is just fun. Find out where to go in your area.

What will I do with all of my plump, yummy berries? We freeze ours so that Eric can make blueberry pancakes all year long. Then, I search for recipes.

This year, I got a copy of Put 'em Up! and have been staring at it non-stop. It's really a canning Bible. We made the blueberry leather (like a fruit roll-up) and while I'll admit that mine didn't turn out exactly right, it was fun and tastes good. I can't wait to try more recipes using my CSA veggies.

My all-time favorite blueberry recipe is the Martha's blueberry buckle. It's so, so good - especially for breakfast. Yum....

Mint is for Breakfast

This is one of Eric and my favorite breakfast treats. As soon as mint starts creeping in our alley, we start thinking about it.

What is it? Challah toast topped with ricotta cheese, honey, and mint. Sounds a tad strange, I know, but trust me, if you like those ingredients on their own, you'll love this! We first had it at The Beauty Shop for brunch. I haven't been there in a while so I'm not sure if it's still on their menu, but we've done our best to recreate it at home. The bread there was grilled, which was yummy, but not doable at 7am in the morning. Try it! Enjoy!

Garden Party

What are these smiling 2nd and kindergardeners eating? Could it be...is it...salad?!

My class got together with Ms. Prewitt's 2nd grade class to have a garden party - we ate the lettuce and herbs that we had cared for this spring.

Ms. Prewitt played celebrity chef as she talked and chopped a mixture of herbs (parsley, basil, thyme, oregano, and rosemary) and shook it into a dressing with olive oil and balsamic vinegar. Everyone wanted a sniff and was very curious about what she was doing.
Then I mixed the dressing onto a bed of fresh lettuce leaves and cooked whole wheat pasta. Nearly everyone gave the pasta and salad a try and many came back for seconds. Several commented on how they had never eaten anything they had helped grow before.

I think the simplicity and freshness of the dressing appealed to their picky taste buds. I'll have to give this one a try at home too.

Sewing Party

Each semester, we celebrate the end of Sewing Club with a little party. I make a slide show of all the millions of pictures I take of the kids and their creations, they show off their favorite projects, and Mrs. Shannon puts together a great treat. This time, she made large sugar cookies and chocolate buttons. The kids loved frosting and decorating their own cookies. Simple, and perfect!
I have also been wanting to tell you about this cute felt birthday cake pattern I tried. It was loads of fun. I made the cake as a display for the Sewing Birthday Party we donated to our school's auction. I heard the party was well received and the bids were high! Our party is for up to 12 kids and includes all materials to make a project as well as a favor of the famous chocolate buttons.

7-Up Cake is Yummy

Eric always requests a 7-Up Cake for his birthday. This cake is like a pound cake, but uses 7-Up as the leavening. It's really tasty and moist. I guess I could make it more often, but then it wouldn't be as special. We like to eat it for breakfast too.

7-Up Cake
1 1/2 cup butter
4 eggs
1 Tablespoon lemon juice
2 1/2 cup sugar
3 cup flour
3/4 cup 7-Up

Heat oven to 325 degrees. Butter and flour Bundt pan.
Cream butter and sugar. Add eggs 1 at a time. Mix well. Add lemon juice, flour and 7-Up. Mix well. Pour into pan. Bake 1 1/2 hours. Top will be brown and toothpick comes out clean.

Eric loves it topped with a lot of chocolate ganache.

Gift Giving Wrap-Up

Pun intended!


I felt like a real holiday elf last year as I sewed and baked gifts for friends and family near and far. Granted, I didn't get some packages in the mail until December 23, but they still arrived Christmas weekend.


Way back in November, I started transforming fabric scraps into sachets. Some featured embroidery work; others were log cabin quilt squares or fabric "houses" machine sewn onto muslin squares. I went to a local boutique, Maggie's Pharm, for sweet-smelling lavender, cedar chips and cloves, and put a little bit of stuffing into the corner of each pillow before adding the herb mixtures and sewing them closed. I printed the gift tags, found here.


Next, I took some of my favorite fat quarters, and cut them down to make dishtowels. I combined two sets of instructions from Beeper Bebe's tutorial, Cloth Napkins Five Ways, embroidering the faces onto muslin triangles while I watched my favorite holiday movie, Christmas in Connecticut, and then folded, ironed and sewed the dishtowels a few days later.

Note: when embroidering a lot of small projects at once, I find that it's easier to draw the patterns on a bigger piece of muslin, then cut each piece down to size afterwards. It cuts down on the mess (especially when you're embroidering next to a frisky dog on a dimly-lit couch), and the embroidery hoop has less of a tendency to slip and slide. After I was all done, I realized I should've added stabilizer to the muslin, or used linen, so the brightly-colored cotton dishtowel doesn't show through. Next time...


Finally, I baked lots of mini-loaves -- white sandwich bread, banana bread, cranberry bread, and this fantastic Martha Stewart recipe for pumpkin sage bread. I also had some cookies stashed in the freezer that Amie and I had made -- chocolate ginger cookies and pecan tassies -- that I stuffed into cellophane bags, then put inside coffee cans for mailing. Bands of pretty paper completed the look. Unfortunately, the bacon fudge recipe we tried was a total bust.

Even with all of the supplies I already had on hand, sewing and baking so much stuff cost more than I'd originally intended. That said, I couldn't wait to give, give, give this Christmas season...

Button Cookies

Besides having our Stuffed Animal Clinic, we also had a little party on the last day of Sewing Club. A highlight is watching a slide show of all the pictures taken during the course of the semester. Plus, there's always a sewing-themed treat from Mrs. Shannon. This year was button cookies.
The kids enjoyed "sewing" their cookies with icing. Some got more carried away than others....
If you want to make your own button cookies, Mrs. Shannon recommends using a basic sugar cookie recipe (even a bag mix will work). Cut the cookies into circles and bake. When the cookies are almost done, take them out and use a straw to make 4 holes. Let cool and then add icing. She added food coloring to the mix and made orange and purple buttons, too.

Note: Making the holes before the cookies bake is NOT a good idea. The holes will cook back together and you don't get the cute button effect.

Brie S'more

While camping last weekend, Eric and I invented a tasty new treat after the kids went to bed - the Brie S'more.

Melt a big slice of brie in the fire then place on a fancy cracker. Delicious!

We didn't have any, but I'm guessing that fig or other preserves would be nice on top.

Yummy Lunch

At school, eating in a classroom with 18 noisy kids talking with their mouths full of food, it's hard to enjoy lunch. I try, though. And Angry Chicken's tomato soup really helps. If you haven't tried this recipe and like tomato soup, you should. It's super simple and quite satisfying. Today, I tried really hard to ignore the craziness and just concentrate on the soup.

Crumpets Are Good Anytime of Day

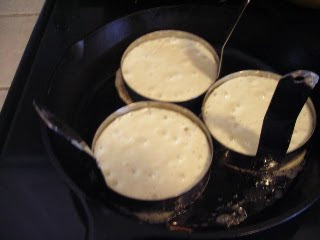
When Eric brought home a recipe for crumpets from our favorite baker, I was excited. Nothing beats a yummy bread ready for some homemade jam. We had ours for a late lunch, but anytime of day would work.


It turns out that making crumpets isn't as hard as it sounds. (I can say this because Eric was the one who actually made them, I just helped out in the eating department.)


All you need is a good skillet and as many egg rings as you can fit in it. He found the rings at the local restaurant supply store.


If you would like to give them a try, here's the recipe:

1 t. sugar
1 t. instant yeast
1/4 cup warm water

8 oz. (2.3 cups) all purpose flour
1 t. sugar
1 t. salt
10 oz. (1.6 cups) warm milk

1. Proof the yeast by mixing the first 3 ingredients together. Let sit for a few minutes until its kind of bubbly.

2. Mix the remaining dry ingredients together in a big bowl and then add the yeast mixture.

3. Add the warm milk, cover the big bowl with a towel, and let rise for 45 minutes (it won't rise too much and it won't get very thick).

4. Heat skillet to a medium heat. Butter up the skillet and the inside of the rings. Pour the batter in to fill up the rings about halfway and cook for about 5 minutes. Then flip and cook for another 2-3 minutes.

This makes 9 crumpets. They were best right out of the skillet with jam, but were still pretty great toasted up the day after.