Sock Bunnies

 Looking for a quick, last-minute Easter project?  This is it!  These sock bunnies come together in no-time and are so fun to make.

We used little girl toddler socks, but any sock will do.  Cut down the top of the sock down where it goes around the ankle to make the ears.  Now, stuff the sock and secure the top with 1/2 a pipe cleaner (or ribbon or twisty tie).  Decorate your bunny with various craft materials, ribbons, markers, etc. and see what personality your bunny takes on! 
 We used hot glue to attach the embellishments, but you can sew them on too.

 Maybe your bunny needs a little carrot so it won't get hungry?
I also love the sewn sock bunnies over at Kleas - will have to try that one next year!

Wishing you a Hippity, Hoppity Easter!

4 Eggcellent Experiments

 To kick off our unit about eggs, my class had fun with "Eggcellent" experiments.
 Experiment #1:  Rubber Egg (also called a Naked Egg)

Find out what happens when you soak a raw egg in vinegar for a few days.  Ours broke open to reveal a yolk that felt like jelly.  Ewwwww!!!!


 Experiment #2:  Strong Egg

This was a favorite.  Hold a raw egg in your hand and squeeze from end to end as hard as you can.  It won't break!  Really, it won't!

 Experiment #3:   Egg in a Bottle

This one involves a peeled, hard boiled egg being sucked into a bottle.  How does it happen?!


 Experiment #4:  Spinning Egg

Just by spinning an egg, you can tell if it's hard boiled or raw.

 We recorded our findings in a little book.

Even our principal stopped by to join in the fun.  He wanted to test the strength of eggs using the cone.  He cracked the egg!

I found several more "eggcellent" experiments here if you want to try them too.

Paper Egg

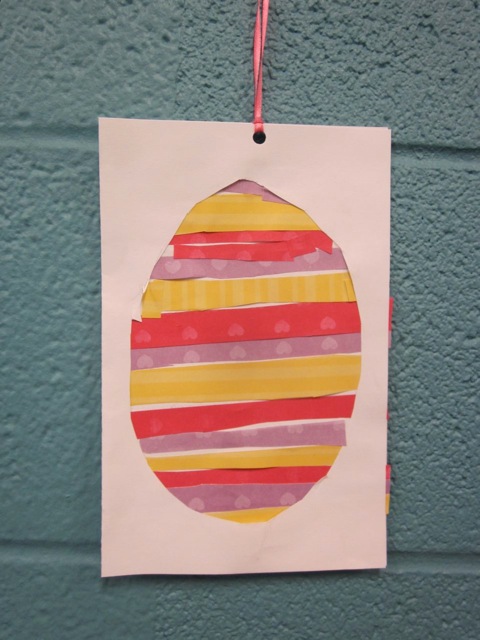
My kindergarten class and their 3rd grade buddies had so much fun making these little paper eggs yesterday, I just had to share.

The original inspiration came from here, but I set out to make it a little simpler to make in a classroom with 30 kids at one time.
First, we copied an egg pattern onto the left side of a piece of card stock.  The kids cut out just the egg.  We showed them how to give the egg a little fold, make a small slit, and then cut out the egg.  Tape helped to repair those that got a little off track!

Next, fold the paper in half, so that the cut out egg is over the other half of the paper, making a little window.
Now comes the fun part!  Gather together a bunch of paper.  We used bits of construction paper, scrapbooking paper, and even pretty magazine pages.  The kids can cut them into strips, chunks, whatever they want.
The kids had so much fun creating their designs.  As they glued on their paper, they could fold over the egg window periodically to check to see how their egg was looking.

Once the design was complete, put glue all around the cut out egg window.  Fold over and press down.  If any paper strips stick out, just trim them.
Each one was different!  We encouraged the kids to write a little message on the back of the eggs to give to parents and grandparents.  Then, we punched a hole a the top and added a pretty ribbon for hanging.
 I even brought home the supplies so that my kids can make them for relatives - such a sweet card!

Fabric Cross

This week in Sewing Club, we made Fabric Covered Crosses for Easter.  Since we are at a faith-based school, we are able to do projects like this.
 To prep, we made crosses out of 2 sticks.  Just bind them into a cross shape with twine.

Next, cut strips of fabric, leftover ribbon, yarn, mardi-gras beads and more to wrap and tie around the cross.  There is no rhyme or reason to it.
 Everyone had fun making a unique cross of their own.

Q Quilts

This week we are working on the letter Q, which I always use as an excuse to talk about quilts in class.  As I was looking through the blog to remember what I did and how I did it, I thought I'd share with you too!

Favorite Things Quilt inspired by Patricia Polacco's The Keeping Quilt.

The Friendship Quilt - can't wait to see how this year's quilt turns out!

The quilt journal is always a favorite and inspires lots of good writing.  Plus, it's a fun way to use up all our fabric scraps!
I love making Story Quilts with the kids and have even made a friendship quilt version of this - using paper instead of fabric.
The Q Quilt is my all time favorite way to reinforce the relationship between Q and U.  When you write the words, you have to make sure Q and U are together.  Plus, they look super cute hanging in the classroom.

This year, I have some mathy ideas for quilts, so I'll be sure to share them with you!


Scrappy Quilt

Phoebe sewed her very first quilt!  It's a little lap quilt, but is a real quilt!  She's been snuggling with it nightly.  We took the Adult/Child Quilting Workshop at Sew Memphis and had fun with teacher Pannay Guigley as she guided the class filled with mother-daughter pairs along.  I acted as Phoebe's lovely assistant.
One of Phoebe's favorite parts was using the iron.  I have to admit, I was a little nervous letting her iron, but she did a great job and was very careful.  Here, she really learned about seam allowances and making sure that the good sides are together when she sews.
After we put together all the squares, Phoebe had fun laying out the quilt.  She tried to make sure that no two same fabrics or same kind of squares touched.
Sewing the squares together.  She used my machine and the 1/4 inch foot.  I was a little worried that it would be way wonky and not come together nicely, but it did!
We made a little flip and turn quilt and tied it together with embroidery thread.  She's so proud & cozy!  You can make one too!  Follow Pannay's directions.

Now, while I may have been able to do this with her at home, I will say that having dedicated time (it was a 3 week class) as well as having someone else help us along the way was wonderful.  You might know how it can be trying to help your own child at times.  I hope this is the first of many more mother/daughter classes!

Counting by 2's

 If you're like me, you count by 2's a lot.  I find myself counting by 2's much more than 5's or 10's - it's just so handy.  I noticed while making our 2x2 necklace, that several kids could count by 2's by rote, but were unable to count actual objects.  Well, that would not do!

So, I came up with a few activities that I thought I would share.
 First, I had the kids write numbers 1-30 then highlight them, counting by 2's.
They used the number chart to help them count beads strung onto chenille strips by 2's.  I made a lot of strips using different beads and numbers.  By the end the kids were doing a much better job of counting by 2's and felt confident.
 The next week we switched it up by having the kids count different kinds of objects.
I filled several bags with different items that could be counted easily by 2's.  Right now, I made sure that the amounts are even, but as they become more advanced, odd numbers would be a fun challenge.

The kids dumped the bag out onto one side of the tray and then slide the objects over by 2's to the other side.  For many, this activity made a lot of sense and they really started to get it!  I had a little recording sheet to write down their numbers and number grids to help them count if needed.

In a few weeks, we'll revisit these activities and check for progress.

Kandinsky Circles in Felt

As I walked by Mrs. Shannon's class the other day I did a double take.  The kids were sewing Kandinsky inspired circles onto a painted canvas to create a circle tree!  The results are spectacular.
I immediately asked her how she did it and she said that the kids first painted the canvas a solid color of their choice.  After drying, they cut out a brown felt trunk.  The trunk was attached to the canvas with spray adhesive.
The kids cut out various sizes and colors of circles from felt.  They arranged the circles and then sewed them on with a simple stitch or two directly onto the canvas.  Craft thread and #22 Chenille needles were used with success.
Here is a view of the back.  As you can see, just a stitch or two was all that was used to hold the circles in place.

Heart Tapestry

I am in love with our heart tapestry!  We started it at Valentine's, but I am just getting around to posting about it.
 Instead of the usual burlap base, I put muslin on the tapestry table.  The kids cut out hearts from felt and used craft thread and #22 chenille needles to sew them onto the tapestry.   This required a little bit more skill than using the big tapestry needles and yarn, but most kids did well since we have sewn so much this year.
 The work started slowly at first.  Each sewing on a single heart.
 By the second week, everyone was excited about it and added more and more hearts and little embellishments to the hearts already on the tapestry.
 We took the muslin off the table and hemmed the edges.  A few loops of rick-rack hang it up.

Details of a few hearts.  Little stitches and stacked hearts.