I've written a lot about embroidery with kids in the past. The posts are scattered throughout and I thought it might be helpful to have them all here in a tidy little post of their own. So, here is goes. Follow the links for specifics and examples.
Getting Started
This post shares the my philosophy and supplies for embroidering with kids.
Start Sewing
This is the basics. You'll learn about stitches, and some tips for embroidering with kids.
Embroidering With a Group
Here, I give tips for sewing with several kids at once. I have 16 kids in my classroom. We start off in small groups of 3 or 4 and by the end, I'm sewing with the whole class at once. Dauting at first, but with a little planning and a lot of patience, it can be done!
This post also features some "oops" moments in embroidery which I showed my class - very helpful for solving problems and avoiding mistakes.
Projects
Ideas for embroidering with kids. I think it goes beyond just the sewing - it's making something useful. Why are you embroidering in the first place??
We Embroidered!
My first embroidery post - the pillow for Mother's Day project still holds true and I can't seem to get past it. I use this post to show my class the process of making an embroidered pillow.
I know that I'll continue to post about embroidery with kids - they love it and often dive right in. Embroidery not only allows for creativity, but requires patience and enhances fine motor skills. And what a sense of pride these kids have when they give their moms their pillows. I also know that our moms loved the pillows we sewed for them this year!
Showing posts sorted by relevance for query embroidery with kids. Sort by date Show all posts
Embroidery with Kids: Getting Started
I've been working on a top secret embroidery project with my kindergarten class (yes, that would be mother's day gifts!) and it's led me to think about embroidering with kids. This week, I thought I'd share my ideas on the topic. This is the first part of several posts on the subject.
Andria and I chose not to include embroidery in the Sewing School book, but we always include embroidery in our camp. The kids love it and it offers a new outlet for creativity.
Today, the focus will be on philosophy and supplies. So, here we go!
My Philosophy:
When I talk about embroidery, I approach it as "drawing with your needle." Just as kids use markers and crayons to express themselves and bring color to their artwork, embroidery is another extension of that. This is why I always start kids out by drawing and embroidering their own designs. I've found that if I use a pre-made design, the kids will get caught up on making it look exactly like the example or can't decide what color to use to sew. Because they didn't initiate the design, they don't seem to execute it as well. The wonderful creative freedom that children still hold onto so dear is somewhat lost. By drawing their own designs directly onto the muslin with a pencil and then tracing the lines with colorful thread, kids embrace embroidery and get excited about it. I also showed my class the Flicker: Children's Embroidery Pool to give them some inspiration and help them to visualize what I meant by "embroidery."
Another thing I've noticed through the years is that embroidery should not be a child's first experience at sewing. Kids who have made a few pillows and are confident sewers, have a much easier time at embroidery. Embroidery is much more exact than simply stitching around a stuffie or pillow. Start there and then move into embroidery. This will ease a lot of frustration, believe me!
Supplies I Use:
I use the standard Sewing School supplies - craft thread, Chenille 22 needles, LoRan needle threader as well as a 6-inch embroidery hoop and muslin. If you use embroidery thread, divide it into strands of 3 for kids to use.
The 6-inch hoop size seems to fit well into a child's hand and is big enough for creating a good design. You don't want the project to take all year!
For our small pillows, I pre-cut the muslin in 8-inch squares. This fits just right on the hoop and makes into a cute, decorative pillow. If there is a lot of hang-over on the hoop the edges will get sewn too - this is not good.
To begin, go ahead and place the muslin on the hoop nice and tight - kids are fascinated by how the hoop works. Be prepared to have them hit it like a drum. Many of mine students wanted to try putting on the fabric themselves. Next, give them a sharp pencil to draw their design directly onto the fabric. For a first timer, simple is best. Just a good outline of a shape or some words written in their neatest handwriting is best.
Now we are ready to thread our needles! Next time, we'll talk about sewing.
Andria and I chose not to include embroidery in the Sewing School book, but we always include embroidery in our camp. The kids love it and it offers a new outlet for creativity.
Today, the focus will be on philosophy and supplies. So, here we go!
My Philosophy:
When I talk about embroidery, I approach it as "drawing with your needle." Just as kids use markers and crayons to express themselves and bring color to their artwork, embroidery is another extension of that. This is why I always start kids out by drawing and embroidering their own designs. I've found that if I use a pre-made design, the kids will get caught up on making it look exactly like the example or can't decide what color to use to sew. Because they didn't initiate the design, they don't seem to execute it as well. The wonderful creative freedom that children still hold onto so dear is somewhat lost. By drawing their own designs directly onto the muslin with a pencil and then tracing the lines with colorful thread, kids embrace embroidery and get excited about it. I also showed my class the Flicker: Children's Embroidery Pool to give them some inspiration and help them to visualize what I meant by "embroidery."
Another thing I've noticed through the years is that embroidery should not be a child's first experience at sewing. Kids who have made a few pillows and are confident sewers, have a much easier time at embroidery. Embroidery is much more exact than simply stitching around a stuffie or pillow. Start there and then move into embroidery. This will ease a lot of frustration, believe me!
Supplies I Use:
I use the standard Sewing School supplies - craft thread, Chenille 22 needles, LoRan needle threader as well as a 6-inch embroidery hoop and muslin. If you use embroidery thread, divide it into strands of 3 for kids to use.
The 6-inch hoop size seems to fit well into a child's hand and is big enough for creating a good design. You don't want the project to take all year!
For our small pillows, I pre-cut the muslin in 8-inch squares. This fits just right on the hoop and makes into a cute, decorative pillow. If there is a lot of hang-over on the hoop the edges will get sewn too - this is not good.
To begin, go ahead and place the muslin on the hoop nice and tight - kids are fascinated by how the hoop works. Be prepared to have them hit it like a drum. Many of mine students wanted to try putting on the fabric themselves. Next, give them a sharp pencil to draw their design directly onto the fabric. For a first timer, simple is best. Just a good outline of a shape or some words written in their neatest handwriting is best.
Now we are ready to thread our needles! Next time, we'll talk about sewing.
Embroidery with Kids: Sewing with a Group
It's easy to sew with 1 or 2, but when you sew with a crowd (especially kids) it's best to be prepared! My class has 18 kindergarten kids and luckily I have a wonderful assistant to support me in my crazy endeavors. Although I teach young kids, I think I would handle things pretty much the same with older ones. Here are a few tips for doing an embroidery project in your classroom.
*Be prepared. While you want to have the kids become independent sewers, your life will be so much happier if you have the fabric already on the hoops and some needles pre-threaded.
*Start off in small groups. We began with groups of 3 for 15 minute each over a 3 day period. This way, I could sit with the kids, make sure they were on the right track and understood what to do. After this initial period, they sewed during other designated times. By staggering the starting points, the kids worked and finished at different times which was helpful. Everyone wasn't clambering for help all at once.
*Make sure your project has a purpose. Knowing why they are doing something and what the finished project should look like is very important for kids. Embroidery for embroidery's sake is not going to sit well with young sewers. Next time I'll show off some cool projects.
*While many kids will need your help with threading needles, tying knots, and fixing mistakes, make sure you have a "DIY" station stocked with needles, threads, and scissors for the kids to practice threading on their own. I even had Sewing School open to the the theading a needle page for reference.
Oops!
Here are some common mistakes that I encountered and tried to explain to the kids.
Oops! Someone sewed around the hoop! You can only go up and down - no whipstiches in embroidery. How to fix it - unthread the needle, pull out the stitches and start again.
Oops! I drew too much and will never, ever finish in time! How to fix it - unfortunately, I didn't catch this one until the sewing had started. Luckily, pencil lines will disappear with a little wash. She'll sew what she can and then we'll wash it to take out extra pencil lines before turning it into a pillow.
So, with a little planning, heads up, and time, sewing with a group of kids is fun and very rewarding.
*Be prepared. While you want to have the kids become independent sewers, your life will be so much happier if you have the fabric already on the hoops and some needles pre-threaded.
*Start off in small groups. We began with groups of 3 for 15 minute each over a 3 day period. This way, I could sit with the kids, make sure they were on the right track and understood what to do. After this initial period, they sewed during other designated times. By staggering the starting points, the kids worked and finished at different times which was helpful. Everyone wasn't clambering for help all at once.
*Make sure your project has a purpose. Knowing why they are doing something and what the finished project should look like is very important for kids. Embroidery for embroidery's sake is not going to sit well with young sewers. Next time I'll show off some cool projects.
*While many kids will need your help with threading needles, tying knots, and fixing mistakes, make sure you have a "DIY" station stocked with needles, threads, and scissors for the kids to practice threading on their own. I even had Sewing School open to the the theading a needle page for reference.
Oops!
Here are some common mistakes that I encountered and tried to explain to the kids.
Oops! Someone sewed around the hoop! You can only go up and down - no whipstiches in embroidery. How to fix it - unthread the needle, pull out the stitches and start again.
Oops! I drew too much and will never, ever finish in time! How to fix it - unfortunately, I didn't catch this one until the sewing had started. Luckily, pencil lines will disappear with a little wash. She'll sew what she can and then we'll wash it to take out extra pencil lines before turning it into a pillow.
So, with a little planning, heads up, and time, sewing with a group of kids is fun and very rewarding.
Embroidery with Kids: Start Sewing
The best part of embroidering with a group of kids is this. Quietly and happily sewing together. Chatting about their stitches, what they ate for lunch, and favorite Star Wars characters. I love how the act of embroidery can be both individual and social at the same time.
In Part 1 of this little series, I talked about my philosophy of embroidery with kids and supplies to get you started. Now we have our materials and have drawn the design with pencil onto the muslin. It's time to get sewing.
I am smitten with Lilli's unicorn. She outlined the shape with a running stitch and then filled in the horn and heart using a satin stitch. This is typical work from a 6 year old.
When I begin to show kids how to embroider, we talk about the size of stitches (about the size of a fingernail) and how you want to leave just a little space between each stitch. As kids become confident in their sewing, I'll show them my favorite stitch - the backstich!
They also want to fill things in. Use the satin stitch. When they are ready for this, I model it a few times and then let them give it a go. Make sure they outline first with a running stitch.
I just discovered a few YouTube videos of stitches. These are great - no words, but you understand the stitch perfectly. I will have to show these next time I work with kids.
A few tips for kids:
*Always start from the back so your knots will be hidden.
*Use a running stitch to carefully go over your pencil lines. Stitches should be small, about the size of a fingernail. Too big and they may sag, too small and they are hard to see.
*Outline your shape first before you fill it in.
*Don't worry about what the back looks like. When you sew, look at the front and just poke your needle around to find where you need to go. You'll get the hang of it!
*Take your time! Embroidery takes awhile and should not be rushed.
How nice to have the time to embroider!
In Part 1 of this little series, I talked about my philosophy of embroidery with kids and supplies to get you started. Now we have our materials and have drawn the design with pencil onto the muslin. It's time to get sewing.
I am smitten with Lilli's unicorn. She outlined the shape with a running stitch and then filled in the horn and heart using a satin stitch. This is typical work from a 6 year old.
When I begin to show kids how to embroider, we talk about the size of stitches (about the size of a fingernail) and how you want to leave just a little space between each stitch. As kids become confident in their sewing, I'll show them my favorite stitch - the backstich!
They also want to fill things in. Use the satin stitch. When they are ready for this, I model it a few times and then let them give it a go. Make sure they outline first with a running stitch.
I just discovered a few YouTube videos of stitches. These are great - no words, but you understand the stitch perfectly. I will have to show these next time I work with kids.
A few tips for kids:
*Always start from the back so your knots will be hidden.
*Use a running stitch to carefully go over your pencil lines. Stitches should be small, about the size of a fingernail. Too big and they may sag, too small and they are hard to see.
*Outline your shape first before you fill it in.
*Don't worry about what the back looks like. When you sew, look at the front and just poke your needle around to find where you need to go. You'll get the hang of it!
*Take your time! Embroidery takes awhile and should not be rushed.
How nice to have the time to embroider!
Embroidery with Kids: Projects
As I mentioned before, embroidery needs a purpose for kids. If they don't know why they are doing it, they don't seem to get excited about it. Here are a few projects to inspire.
A good beginning project for young sewers is to just practice making lines on the fabric. This could make a sweet pillow or wall hanging. Keeping them in the hoop always makes for a great frame. Oh, I just thought of a spider web with little plastic bugs tucked inside. I might have to try this!
Embroidering inexpensive hand towels is a great gift. They can easily be customized for any occasion.
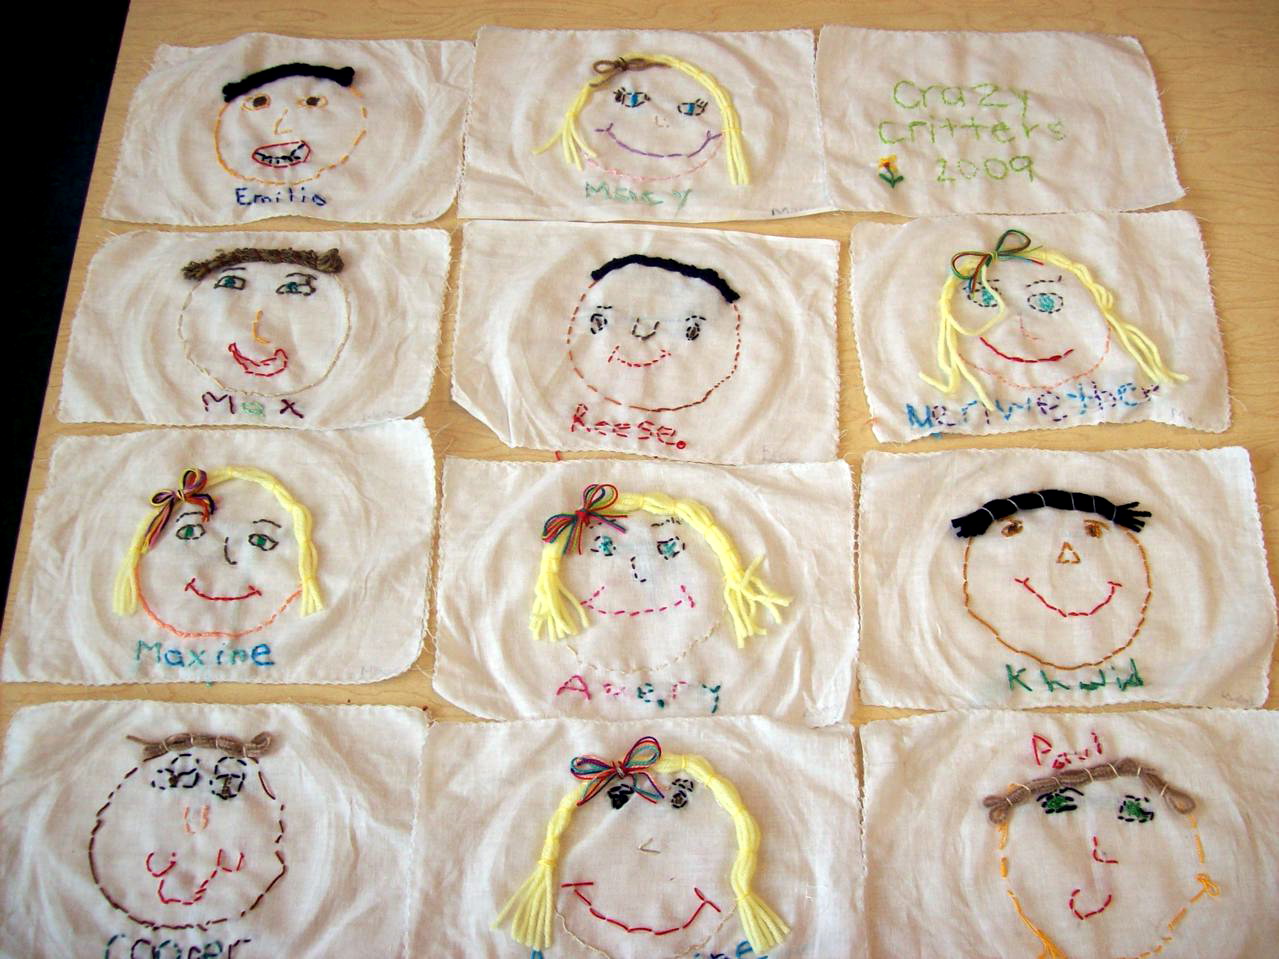
A self-portrait quilt in progress. This was organized by a fellow teacher. I love how she used yarn for the hair. The squares were sewn together and backed. The quilting was just a simple tie. This would be a super school auction item, don't you think?
Mrs. Shannon is making these spring flower pictures in her class right now for Mother's Day. It's actually painted paper embroidered on a canvas. She was inspired by That Artist Woman but gave it her own touch with the paper.
We are making little pillows for Mother's Day. They are 8x8 and backed with Amy Butler fabric - I wanted to give the Moms something that would compliment their homes. They are machine sewn together, stuffed, and hand-sewn closed. Each one is different and reflect the kids' personalities. I can't wait to see the reaction from their Moms!
I hope you enjoyed the embroidery series. It was great for me to reflect on how and why I embroider with kids. There are a lot of great projects and ideas out there and it's easy to adapt most to a child's level. If you're embroidering with a child, I'd love to see what they are making!
A good beginning project for young sewers is to just practice making lines on the fabric. This could make a sweet pillow or wall hanging. Keeping them in the hoop always makes for a great frame. Oh, I just thought of a spider web with little plastic bugs tucked inside. I might have to try this!
Embroidering inexpensive hand towels is a great gift. They can easily be customized for any occasion.
A self-portrait quilt in progress. This was organized by a fellow teacher. I love how she used yarn for the hair. The squares were sewn together and backed. The quilting was just a simple tie. This would be a super school auction item, don't you think?
Mrs. Shannon is making these spring flower pictures in her class right now for Mother's Day. It's actually painted paper embroidered on a canvas. She was inspired by That Artist Woman but gave it her own touch with the paper.
We are making little pillows for Mother's Day. They are 8x8 and backed with Amy Butler fabric - I wanted to give the Moms something that would compliment their homes. They are machine sewn together, stuffed, and hand-sewn closed. Each one is different and reflect the kids' personalities. I can't wait to see the reaction from their Moms!
I hope you enjoyed the embroidery series. It was great for me to reflect on how and why I embroider with kids. There are a lot of great projects and ideas out there and it's easy to adapt most to a child's level. If you're embroidering with a child, I'd love to see what they are making!
Jack-O-Hoop
I am crazy excited to share the Jack-O-Hoop with you! This is one of those projects that emerged from some brainstorming with Sewing Club teachers and turned out better than we ever expected. If you sew with kids, you should add this to your must-do list this Halloween!
Materials needed: Embroidery hoop filled with orange cotton fabric (any size of hoop will work, our larger ones are 10 inches), black felt, sewing thread and needles, chalk, wine cork, green felt, green chinelle strip, hot glue
First, cover the embroidery hoop with orange cotton fabric. Make sure the fabric is in the hoop really tightly! Trim the fabric close in the back of the hoop so that it will not poke out the edges. For Sewing Club, we pre-made the hoops for the kids.
Next, draw the face shapes onto felt with chalk. Cut them out and place on hoop. If sewing with kids, remind them that the metal screw is the top of the hoop so that the face will not be upside down.
Sew on the face. Some kids might need you to pin the pieces in place. They can just use one long piece of thread to sew on all the face pieces like in traditional embroidery.
I love the top that fellow Club teacher Katie designed. First, hot glue a wine cork to the top of the hoop near the metal screw. Cut out a felt leaf and glue it onto the cork. Ideally, the leaf will hide the metal screw. Then, add a curled up green chenille strip. Twist it around the metal screw. You can also add a ribbon for hanging.
Once you get going, you'll want to stitch up an entire pumpkin patch!
The possibilities are endless as you'll see from the many cute examples I couldn't help but show you!
Happy Jack-O-Hooping!
Materials needed: Embroidery hoop filled with orange cotton fabric (any size of hoop will work, our larger ones are 10 inches), black felt, sewing thread and needles, chalk, wine cork, green felt, green chinelle strip, hot glue
First, cover the embroidery hoop with orange cotton fabric. Make sure the fabric is in the hoop really tightly! Trim the fabric close in the back of the hoop so that it will not poke out the edges. For Sewing Club, we pre-made the hoops for the kids.
Next, draw the face shapes onto felt with chalk. Cut them out and place on hoop. If sewing with kids, remind them that the metal screw is the top of the hoop so that the face will not be upside down.
Sew on the face. Some kids might need you to pin the pieces in place. They can just use one long piece of thread to sew on all the face pieces like in traditional embroidery.
I love the top that fellow Club teacher Katie designed. First, hot glue a wine cork to the top of the hoop near the metal screw. Cut out a felt leaf and glue it onto the cork. Ideally, the leaf will hide the metal screw. Then, add a curled up green chenille strip. Twist it around the metal screw. You can also add a ribbon for hanging.
The possibilities are endless as you'll see from the many cute examples I couldn't help but show you!
Happy Jack-O-Hooping!
I got some new craft books!
What a happy day when the postman delivered these two new craft books to my mailbox this past week. I had fun looking through them and gaining new inspiration and ideas for sewing camp.
First up is Annabel Wrigley's We Love to Sew - Gifts. The newest book in her sewing books aimed at young girls, is filled with fun and useful ideas. I am a big fan of her Little Pincushion Studio. It's so fun to see what others are making with kids.
I love this mirror - I can picture it hanging in a school locker. It's also a good introduction to patchwork.
These bowls are just too cute! They are a wonderful use of scraps and I think kids would love sewing the rope. I can't wait to make one myself.
The instructions are clear and full of photos. Just right for sewing with kids.
Next up, is Stitch Love by Mollie Johanson. Her blog Wild Olive is a favorite of mine, and I am a proud member of her 50 States Club. Her book is full of adorable animal embroidery patterns.
Besides just having cute patterns, there are some clever projects such as this possum sachet.
The embroidery patterns are simple, but filled with personality. Mollie gives clear directions for how to transfer patterns and different stitches.
While written for adults, I am excited to share some of these patterns and ideas with my sewing campers this summer. I know they will love them!
Happy sewing!
First up is Annabel Wrigley's We Love to Sew - Gifts. The newest book in her sewing books aimed at young girls, is filled with fun and useful ideas. I am a big fan of her Little Pincushion Studio. It's so fun to see what others are making with kids.
I love this mirror - I can picture it hanging in a school locker. It's also a good introduction to patchwork.
These bowls are just too cute! They are a wonderful use of scraps and I think kids would love sewing the rope. I can't wait to make one myself.
The instructions are clear and full of photos. Just right for sewing with kids.
Next up, is Stitch Love by Mollie Johanson. Her blog Wild Olive is a favorite of mine, and I am a proud member of her 50 States Club. Her book is full of adorable animal embroidery patterns.
Besides just having cute patterns, there are some clever projects such as this possum sachet.
The embroidery patterns are simple, but filled with personality. Mollie gives clear directions for how to transfer patterns and different stitches.
While written for adults, I am excited to share some of these patterns and ideas with my sewing campers this summer. I know they will love them!
Happy sewing!
Summer Camp Time!
Summer Camp is where it all began! I look forward to each summer where I can just sew with kids. Their wonderful imaginations and creative spirits never cease to amaze me!
This summer, I am excited to be teaching not only Sewing School camp, but also Urban Scout - a new camp that combines all that I love about teaching kids.
Sewing School Camp
June 8-12, 8-12
boys and girls, rising 1st - 8th
Grace-St. Luke’s Especial School Summerfest
Boys and girls will have fun creating original fabric projects including pillows, stuffed animals, clothing, embroidery, and more! Both hand and machine sewing skills will be taught. This camp inspired the Sewing School books. No needle experience necessary!
Urban Scout
June 22-26, 8-12
boys and girls, rising 1st - 5th
Grace-St. Luke’s Especial School Summerfest
A shout-out to city-dwelling kids to stop and take a closer look at their surroundings and appreciate the nature around them. Campers will participate in a variety of traditional scouting activities such as knot-tying, gardening, camping, and sewing, all with an urban twist. This camp is new this year and incorporates all that I love about crafting and learning with kids.
Hope to get the opportunity to create with your child this summer. If you live far away or can't make it, don't worry, I'll be sharing all the best ideas here on the blog and on FaceBook.
Stuffing Frenzy
Making pillows of all shapes and sizes is a new sewer's favorite activity. Not only do you end up with a cuddly, useful piece, but you get to stuff it too! At camp, we had some kids that made pillows exclusively.

When making pillows, I encourage kids to make a paper pattern for their pillow shape. Next, they cut out the pattern and trace it with chalk onto the fabric. Here, we talk about placing the pattern on the outer edges of the fabric, not right in the middle. After tracing the pattern twice, it's time to cut it out and then sew it together. Be sure to leave a big enough hole so that you can get all the stuffing in! I usually take out the needle during the stuffing process, at least at the beginning. After stuffing, sew up the hole and give the pillow a big hug!
My class last year got obsessed with making itsy bitsy pillows. Some kids had an entire collection. I have no clue what they did with them, but they were a source of endless entertainment.

Using two different colors of fabric and fabric markers to design a pillow.
A masterpiece....the embroidered pillow using 2 Sublime Stitching patterns and a hand-drawn tree. I love the use of different colored embroidery thread around the edges.
At this stage in sewing, you'll find that kids want to see the stitches around the edges and are not interested in turning a pillow inside out. They are so proud of their stitches and I've seen kids trace back their sewing with their fingers after a project is complete.

When making pillows, I encourage kids to make a paper pattern for their pillow shape. Next, they cut out the pattern and trace it with chalk onto the fabric. Here, we talk about placing the pattern on the outer edges of the fabric, not right in the middle. After tracing the pattern twice, it's time to cut it out and then sew it together. Be sure to leave a big enough hole so that you can get all the stuffing in! I usually take out the needle during the stuffing process, at least at the beginning. After stuffing, sew up the hole and give the pillow a big hug!
My class last year got obsessed with making itsy bitsy pillows. Some kids had an entire collection. I have no clue what they did with them, but they were a source of endless entertainment.
Using two different colors of fabric and fabric markers to design a pillow.
A masterpiece....the embroidered pillow using 2 Sublime Stitching patterns and a hand-drawn tree. I love the use of different colored embroidery thread around the edges. At this stage in sewing, you'll find that kids want to see the stitches around the edges and are not interested in turning a pillow inside out. They are so proud of their stitches and I've seen kids trace back their sewing with their fingers after a project is complete.
Subscribe to:
Posts (Atom)