 Andria and I are excited to be teaching a session of Sewing School at the Grace-St. Luke's Episcopal School summer camp in Memphis, TN. The camp is June 15-20 from 8am-1pm open to boys and girls entering 1st grade-5th grade. I will also be teaching an Advanced Sewing School session the same week for kids entering 3rd - 8th grade. See the camp registration for more details.

Calling All Campers!
Andria and I are excited to be teaching a session of Sewing School at the Grace-St. Luke's Episcopal School summer camp in Memphis, TN. The camp is June 15-20 from 8am-1pm open to boys and girls entering 1st grade-5th grade. I will also be teaching an Advanced Sewing School session the same week for kids entering 3rd - 8th grade. See the camp registration for more details.
Rainbow Tapestry - Complete!
We just put the finishing touches on the Rainbow Tapestry. After 4 1/2 weeks, we were ready to be finished. I really loved how everyone worked together and shared good conversation while stitching. To finish, I just turned the edges under twice and whipstitched with embroidery thread. I am regretting that I didn't take a picture of the back, but we whisked it over to the annual school auction. I hope it's new owner loves it as much as I do.

During our school's weekly "Celebration" we showed off the tapestry. There was pride in our hearts.
 Hmm....I'm wondering what we're going to do next...

During our school's weekly "Celebration" we showed off the tapestry. There was pride in our hearts.
 Hmm....I'm wondering what we're going to do next...
Creative Classroom: Story Quilt

 To finish our unit on quilts and work on story comprehension and retelling, we decided to make our very own story quilt. To make things easier, we read a classic fairytale and then gave each child a specific part of the story to illustrate on a 5x5 square. Someone was "My what big eyes you have, Grandma!" while another was "the wolf swallowed Little Red Riding Hood whole."
 After the squares were finished, we put all 19 in sequential order. They loved finding the other parts of the story and "reading" the quilt.
 What's next? Well, we hope to continue to retell the story and share it with other classes. One idea is to have the kids write a sentence about their squares. Our Spanish teacher is also excited to use it to have the kids retell Caperucita Roja in Spanish!
Garden Felt Board
Our new Science Lab theme is gardening. Of course we had to make our own felt board garden.

I glued a background of dirt (brown) and sky (blue) to a piece of foam core board. The kids drew things you grow or find in the garden on cardstock and then gluesticked a bit of felt to the back.
 Inspired by Lois Elhert's Growing Vegetable Soup, we also made labels for each item.
 This was an easy and fun collaborative activity for our classroom. You should make one too!

I glued a background of dirt (brown) and sky (blue) to a piece of foam core board. The kids drew things you grow or find in the garden on cardstock and then gluesticked a bit of felt to the back.
 Inspired by Lois Elhert's Growing Vegetable Soup, we also made labels for each item.
  This was an easy and fun collaborative activity for our classroom. You should make one too!
Little Basket
 I immediately fell for these cute baskets at Maya*Made. While hers was more geared towards Easter, I thought the kids would enjoy them as a space for their little "things." And boy was I right! Easy and quick, the kids turned these out during the hour and were so proud of the results.
When making it with kids: I made a pattern (8X13) for the body of the basket and helped them mark the corners so it would sit right. I also made a pattern for the handle, although some decided to use ribbon. For fabric, we used felt and a black canvas that I had on hand.
Clothespin Dolls
Clothespin dolls were all the rage in Sewing Club. As you can see from the pictures below, there were lots of variations from sweet little girls to St. Patrick himself!

I of course have been drooling over the elaborate ones at The Small Object. My excitement prompted me to buy the pattern at Posie Gets Cozy but thought those instructions were a little too advanced for kids.

I also wanted the project to be doable in a hour or less. So, we went for Sharpies instead of paints.

Next, I found this great tutorial and discovered that a CD is the perfect pattern for a doll dress.

We got our supplies at Harvey's Hobby Hut but I've also spied a fun looking kit at Mahar Drygoods.
Scenes From Sewing Club


Creative Classroom: Kaleidoscope
To end our unit on colors and rainbows, we made our own kaleidoscopes. While this is fun to do and looks cool, the kids informed me that it was not a "real kaleidoscope." So, take it for what it is and have fun looking at the world through a new lens.

OK, let's get started!
Materials needed: plastic wrap (we used purple because that is all I had for some reason), seed beads, toilet paper roll, rubber band, scissors
Step 1: Tear off a rectangle of plastic wrap. Carefully put several pinches of seed beads in a little pile on the plastic wrap.
 Step 2: Gather all the beads together. Fold the plastic wrap over the beads so you have a bead sandwich. Put the toilet paper roll over the beads.
 Step 3: Gather the plastic wrap up over the toilet paper roll.
 Step 4: Secure the plastic wrap with a rubber band.
 Step 5: Trim excess plastic wrap. Some kids opted to just fold it down or leave it as is.
 Step 6. Hold a little away from your eye, look up, and turn your kaleidoscope. You won't see any real patterns, but when you take them outside and look up, the beads look cool in the sky.

You might want to check out these instructions from National Geographic Kids which takes the project a step further. Thanks to Mrs. Howie for giving us the idea!

OK, let's get started!
Materials needed: plastic wrap (we used purple because that is all I had for some reason), seed beads, toilet paper roll, rubber band, scissors
Step 1: Tear off a rectangle of plastic wrap. Carefully put several pinches of seed beads in a little pile on the plastic wrap.
 Step 2: Gather all the beads together. Fold the plastic wrap over the beads so you have a bead sandwich. Put the toilet paper roll over the beads.
 Step 3: Gather the plastic wrap up over the toilet paper roll.
 Step 4: Secure the plastic wrap with a rubber band.
 Step 5: Trim excess plastic wrap. Some kids opted to just fold it down or leave it as is.
 Step 6. Hold a little away from your eye, look up, and turn your kaleidoscope. You won't see any real patterns, but when you take them outside and look up, the beads look cool in the sky.
You might want to check out these instructions from National Geographic Kids which takes the project a step further. Thanks to Mrs. Howie for giving us the idea!
Shorts Weather...Almost

This week is Spring Break and I'm wishing for sunny skies as I sew up some little shorts for Frankie & Phoebe. I let Phoebe pick out her fabrics from my stash.
While I don't think I would ever attempt to sew shorts for myself, it's easy to make them for kids. There are tons of short patterns out there, but I used Simplicity 9786. It has a simple elastic waist and easy-to-follow directions.
Rainbow Tapestry - Week 3

Here we are at the end of Week 3. The kids have continued to use little stitches to fill in the color bands, but it's slow going. At the end of the week, we had a group discussion of where to go next. Me: Do we stop here? Kids: No, we want to finish it. Me: Ok, but how? When? Kids: How about we sew after snack? And after journal time. And after we finish a center. And can we sew during rest time? Me: Yes. I will give you lots of free time to sew.
We will see how it goes. I'm excited that they want to finish it. So many things in the kids' lives are rushed and immediate. It's nice to take our time and to have time to do that.

In case you were wondering, this is a "Mexican Slip Stitch." Holden requests that you please do not sew over it. It is hard to make.
This Could Be Yours!

Although I probably shouldn't share this, because I want to win, The Long Thread has a great giveaway - a custom softie made from your child's drawing! Phoebe has just started drawing "real" things. I'm keeping my fingers crossed that I'll win. However, if I don't, it does give me some good ideas on making my own.
Welcome Baby!
A few people I know are welcoming new lives into theirs. I love making baby gifts!
 My standard is the bib/burp cloth combo. I swear by good burp cloths and since you end up practically living in them, they should be cute, too! I make mine with double-folded cloth diapers with a rectangle of fabric top stitched across one end and a line of ric-rac on the other. Not too bulky, but still has style. For bibs, I use a modified version of the pattern in Amy Karol's Bend-the-Rules Sewing book. I like to use velcro to fasten them. I decided to add the little circles with Heat-n-Bond.
 This combo is ready for the baby shower. I glue sticked a bit of the fabric onto a tag for a quick card. I am loving the way it turned out. Hope the new family does, too.
Quilt Family Day Report
Phoebe and I had a great time at the Brooks Museum Family Day. The exhibit was great and the activities just perfect. I'm looking forward to using them in my classroom in the coming weeks. All of my pictures turned out blurry, because Phoebe was having too much fun to pose, but I'll give you a quick idea of what we did.
One activity was a paper quilt. They supplied paper rectangles, hole punchers, and plastic needles threaded with yarn. I had to punch the paper for Phoebe, but she loved sewing the squares together. This would be a cute idea for the Q Quilt as well, where kids could draw Q pictures on the paper then sew them together. I may have to try this next year.
 I think the activity below was our favorite. The table was covered with buckets of fabric scraps, glue sticks, foam shapes, and card stock. We glued fabric scraps to the card stock. I had to make one too! It was fun to "piece" together a mini quilt. We are planning on making these in class and then turning them into journals. Another idea is to make a picture frame. The next day, Phoebe was in my scrap box wanting to make another "glue quilt." Try this at home!
 The other highlight of the morning was dancing to Last Chance Jug Band who played at my wedding nearly 9 years ago. I also couldn't resist and purchased a few things in the gift shop including this amazing Pattern Play set. I got it for my classroom, but Phoebe and I had lots of fun making quilts on Sunday.


Brush Your Eggs!
Ok, so I know that it's now March and National Dental Health Awareness Month is over, but I had to share this fun experiment we did in class. I also know that this is not about sewing, but it was so fun, I had to share! This is the Kindergarten teacher in me coming out...
To illustrate the importance of brushing teeth, we brushed hard boiled eggs soaked in Coke overnight.
They got all brown, spotted, and yucky. The kids were amazed at how dirty the eggs got from Coke!

Next, we brushed the eggs. We talked about how to brush our teeth, the importance of toothpaste, and how long to brush. I had the kids in groups of 3 and 4.
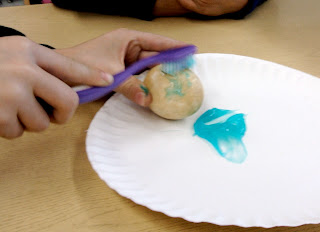
While the eggs weren't gleaming white at the end of about 8 minutes of brushing, you could see a difference!

Typing this up, it does seem a little silly, but I have to say, the kids loved it and it made a big impact! I think I may have to try it at home too.
We also sang this great song to the tune of "Row, Row, Row Your Boat" -
Brush, brush, brush your teeth til they're clean and white. Brush them, brush them, brush them, brush them, morning, noon, and night.
Rainbow Tapestry - Week 2
This week was all about filling in the color bands. There was a lot of collaboration going on and sewing during free-choice time. I suggested using buttons or other materials to fill in the bands, but they decided that the rainbow should be "soft" and maybe fill in the background with buttons.

The kids really concentrated on making tiny stitches to fill up the bands. By the end of the week, the violet and indigo band were nearly filled.

I can't wait to see what happens in Week 3.

The kids really concentrated on making tiny stitches to fill up the bands. By the end of the week, the violet and indigo band were nearly filled.

I can't wait to see what happens in Week 3.
Subscribe to:
Posts (Atom)